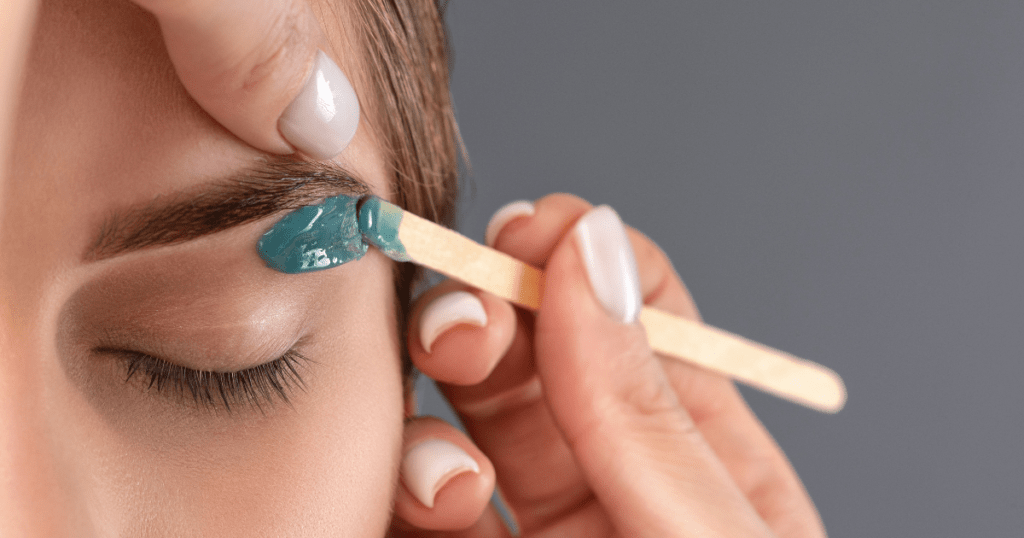
The quest for perfect eyebrows is universal. Many seek to emulate the flawless arches seen on celebrities and models, aiming for brow waxing that complement their facial structure and personal style. However, achieving the ideal brow shape isn’t always straightforward. Without proper technique, brow waxing can quickly lead to several common pitfalls. Over-waxing can result in overly thin brows that take months to grow back. Under brow waxing can leave stray hairs that disrupt the desired clean lines. Using the wrong brow waxing temperature or type can cause skin irritation or ineffective hair removal.
Thank you for reading this post, don't forget to subscribe!Navigating these challenges requires a combination of knowledge, skill, and precision. In this article, we will explore the top 10 brow waxing mistakes to avoid, ensuring that your brow grooming routine enhances your features without the unwanted side effects. Whether you’re a novice at-home waxer or a seasoned beauty enthusiast, understanding these common errors and how to avoid them will help you achieve the perfect eyebrows you’ve always desired.
Brow Waxing Mistakes to Avoid
Over waxing is a common brow waxing mistake that can drastically alter the natural shape of your eyebrows, often leading to overly thin brows. To avoid this, focus on removing only the stray hairs outside your desired brow shape. Use a light hand and check your progress frequently to maintain a natural, balanced look.
1. Over Eyebrow-waxing
Description of the problem:
Over-waxing occurs when too much hair is removed from the eyebrows, significantly altering their natural shape. This can result in overly thin brows that are difficult to correct and may not complement the face well. Over-waxing can lead to patchy areas where hair is sparse or missing, which can make achieving a balanced, symmetrical look challenging. Additionally, frequent over-waxing can damage hair follicles, potentially leading to permanent thinning.
How to avoid:
To prevent over-waxing and maintain the natural shape of your brows, follow these techniques for controlling brow waxing application and hair removal:
- Map Your Brows:
- Use a brow pencil to outline the desired shape of your eyebrows before applying any brow waxing. This will serve as a guide to ensure you only remove hair outside the defined area.
- Identify three key points: the start of the brow (align with the inner corner of your eye), the arch (align with the outer edge of your iris), and the end (align with the outer corner of your eye).
- Work in Small Sections:
- Apply the brow waxing to small sections of hair at a time rather than trying to wax large areas. This gives you more control and helps prevent accidental over brow waxing.
- Start with areas that are clearly outside the desired shape and gradually work towards the edges.
- Use the Right Tools:
- Use a small, angled applicator to apply the wax precisely. This is especially important for intricate areas around the brow.
- Opt for a wax designed for sensitive skin, as it will be less harsh and reduce the risk of irritation.
- Check Your Progress:
- Regularly step back and check your progress in a mirror. Assess both eyebrows to ensure they remain symmetrical and aligned with the natural shape you outlined.
- It can be helpful to take a photo from time to time to see your brows from a different perspective.
- Avoid Over-Tweezing:
- If you’re using tweezers to remove stray after brow waxing, be cautious not to over-tweeze. Tweezing can be very precise, but it’s easy to get carried away and remove too much.
- Focus on removing only the hairs that are clearly outside the mapped area.
- Know When to Stop:
- It’s better to under brow waxing slightly and touch up later if needed rather than remove too much at once. You can always go back and remove more hair, but you can’t replace hair that has been over-waxed.
- Set a time limit for your brow waxing session to avoid getting too focused and making hasty decisions.
By following these techniques, you can achieve well-defined, natural-looking brows without the risk of over-waxing and altering their natural shape.
2. Under-waxing
Description of the problem:
Under brow waxing occurs when the wax fails to remove all the necessary hairs, leaving the brows looking uneven and untidy. This can result from a variety of issues, such as applying the wax too sparingly, not pressing the strip firmly enough, or not pulling the strip off correctly. The consequence is a patchy appearance that undermines the clean, polished look desired from brow waxing.
How to avoid:
- Proper Brow Waxing Application:
- Ensure you apply enough wax to cover the area fully. The wax should create a thin, even layer over the hairs you intend to remove.
- Use a high-quality applicator stick to control the wax distribution accurately.
- Firm Pressing:
- After apply the brow waxing strip, press it firmly against the skin to ensure it adheres to all the hairs. This helps in grasping even the finer hairs that are often missed.
- Smooth the strip in the direction of hair growth to maximize adherence.
- Correct Removal Technique:
- When removing the strip, pull it off swiftly and parallel to the skin, rather than upward. This technique reduces the likelihood of breaking the hairs instead of removing them from the root.
- Maintain a steady, confident motion to ensure all hairs are pulled out cleanly.
- Double-Checking:
- After removing the strip, inspect the area closely for any remaining hairs. Use tweezers to pluck out any strays that the wax missed.
- Ensure both brows are symmetrical by comparing them side by side. Consistency is key to a professional look.
- Proper Lighting:
- Perform your brow waxing in a well-lit environment to easily spot any missed hairs.
- Natural light is ideal, but if that’s not available, use a bright, focused light to ensure you don’t overlook any areas.
- Quality Products:
- Invest in high-quality brow waxing and strips designed for facial hair. Lower-quality products may not adhere well to finer brow hairs, leading to incomplete removal.
- Consider using wax formulated specifically for sensitive skin to reduce irritation while ensuring thorough hair removal.
By following these steps, you can avoid the under brow waxing and achieve a smooth, even brow line that enhances your facial features. Proper technique and attention to detail are essential for professional-looking results.
3. Incorrect Wax Temperature
Description of the Problem
Using the brow waxing that is too hot or too cold is a common mistake that can significantly affect the outcome of your brow waxing session. Brow wax that is too hot can cause burns and severe skin irritation, leading to redness, swelling, and even blisters. On the other hand, brow waxing that is too cold will not adhere properly to the hairs, resulting in ineffective hair removal and a frustrating experience where hairs are left behind or break off instead of being pulled out cleanly.
How to Avoid
Achieving the optimal wax temperature is crucial for both safety and effectiveness. Here are some tips to ensure your wax is at the right temperature:
- Follow Manufacturer’s Instructions:
- Always refer to the instructions provided with your waxing kit. Manufacturers often provide specific guidelines on the temperature settings or the amount of time needed to heat the wax.
- Use a Wax Warmer:
- Invest in a quality wax warmer with temperature control. This device helps maintain a consistent and optimal temperature, reducing the risk of overheating or underheating the wax.
- Test the Wax:
- Before applying the wax to your brows, test a small amount on the inside of your wrist. The wax should feel warm but not hot. If it feels too hot, let it cool down for a few moments before testing again.
- Observe Consistency:
- The wax should have a honey-like consistency. If it’s too runny, it’s likely too hot. If it’s too thick and doesn’t spread easily, it’s too cold. Adjust the temperature accordingly until you achieve the right texture.
- Be Patient:
- Allow the brow waxing to heat gradually. Rapid heating can lead to uneven temperature distribution, with some parts being hotter than others. Patience ensures the entire batch reaches a uniform, safe temperature.
- Maintain Temperature During Use:
- Keep the wax warmer on a low setting to maintain the ideal temperature throughout your brow waxing session. Periodically check the consistency and temperature of the wax to ensure it remains effective.
- Avoid Microwaves:
- While convenient, microwaves can heat the wax unevenly and create hotspots that can cause burns. If you must use a microwave, do so with caution, and always stir the wax thoroughly after heating to distribute the heat evenly.
By following these tips, you can avoid the pitfalls of incorrect wax temperature, ensuring a safer, more efficient, and more comfortable brow waxing experience. Proper temperature management is key to achieving smooth, hair-free brows without compromising the health of your skin.
4. Not Preparing Skin Properly
Description of the problem:
Brow waxing without proper skin preparation is a common mistake that can lead to increased irritation, redness, and even infection. When the skin is not adequately prepped, the wax may not adhere well to the hairs, resulting in inefficient hair removal and multiple passes over the same area, which can irritate the skin. Additionally, unprepared skin can harbor bacteria and oils that exacerbate post-waxing issues, leading to clogged pores and potential breakouts.
How to avoid:
- Cleanse the Skin:
- Begin by thoroughly cleansing the brow area with a gentle, non-comedogenic cleanser. This removes oils, dirt, and makeup residues that can interfere with the waxing process.
- Use lukewarm water to avoid opening pores too much, which can make the skin more sensitive.
- Exfoliate Gently:
- Lightly exfoliate the skin around the eyebrows a day before waxing to remove dead skin cells. This helps the wax adhere better to the hairs.
- Use a mild exfoliant to avoid over-sensitizing the skin. Avoid exfoliating on the day of brow waxing to prevent excessive skin irritation.
- Dry the Skin Completely:
- Ensure the skin is completely dry before applying wax. Any moisture can prevent the wax from gripping the hairs properly.
- Pat the area with a clean, dry towel, and wait a few minutes to ensure all moisture has evaporated.
- Apply a Pre-Wax Oil or Powder:
- For those with sensitive skin, applying a light layer of pre-wax oil can create a barrier that minimizes skin irritation. Make sure it’s a product specifically designed for this purpose to avoid interfering with the wax’s efficacy.
- Alternatively, a small amount of talc-free powder can help absorb any remaining moisture and provide a protective layer between the skin and the wax.
- Assess the Skin Condition:
- Check for any existing skin issues such as cuts, bruises, or sunburn. Avoid waxing over these areas until they have healed completely to prevent further damage and infection.
- Be cautious if you have been using any skincare products with retinoids or strong acids, as these can make the skin more sensitive and prone to damage during waxing.
- Use Clean Tools:
- Ensure all waxing tools, including the applicator and strips, are clean and sanitized. This helps to prevent any introduction of bacteria to the skin.
- Consider using disposable tools or thoroughly disinfecting reusable ones to maintain hygiene.
By following these skin preparation techniques, you can significantly reduce the risk of irritation and infection, leading to a smoother and more effective brow waxing experience. Proper skin prep not only enhances the results but also ensures a more comfortable process with minimal discomfort and skin issues.
5. Using the Wrong Wax Type
Description of the Problem:
Using an inappropriate type of wax for brow waxing can lead to several issues. The skin on the face, especially around the eyebrows, is delicate and sensitive. Hard waxes, soft waxes, and even some at-home waxing kits can vary significantly in their formulation and effectiveness. Hard wax, for example, is often better suited for sensitive areas because it adheres to the hair rather than the skin, reducing the risk of irritation and pain.
On the other hand, soft wax, which is applied with a strip, can be harsher and may cause more discomfort or even skin damage if not used properly. Using waxes designed for body hair can also lead to adverse reactions due to their stronger adhesive properties and potential for harsher ingredients. Choosing the wrong wax can result in redness, irritation, breakouts, and an overall unsatisfactory waxing experience.
How to Avoid:
- Choose the Right Type of Wax:
- Hard Wax: Ideal for sensitive facial skin, hard wax adheres to the hair rather than the skin, making it less painful and reducing the risk of irritation. It is especially effective for coarse brow hairs and allows for more precise application.
- Soft Wax: While suitable for larger areas of the body, soft wax can also be used on the face if it’s specifically formulated for facial use. Ensure it is gentle and designed for sensitive skin to avoid adverse reactions.
- Check Ingredients:
- Look for waxes with soothing ingredients like aloe vera, chamomile, or azulene, which can help minimize irritation and calm the skin.
- Avoid waxes with harsh chemicals, fragrances, or dyes, as these can exacerbate sensitivity and cause allergic reactions.
- Consider Pre-Made Wax Strips:
- Pre-made wax strips specifically designed for facial hair can be a convenient option. These strips usually contain gentler formulations and are pre-measured, reducing the risk of applying too much product.
- Patch Test:
- Always perform a patch test before using a new wax product. Apply a small amount of wax to a discreet area of skin, wait 24 hours, and check for any signs of irritation or allergic reaction.
- Consult a Professional:
- If you are unsure about which wax to use, consult a professional esthetician. They can recommend the best type of wax for your skin type and brow needs, ensuring a safer and more effective waxing experience.
- Read Reviews and Do Research:
- Before purchasing a wax product, read reviews from other users with similar skin types and concerns. Research the brand and product to ensure it is reputable and specifically designed for facial waxing.
By carefully selecting the appropriate wax type and considering your skin’s sensitivity, you can achieve a smoother, more comfortable brow waxing experience with minimal risk of irritation or damage.
6. Poor Aftercare
Description of the problem:
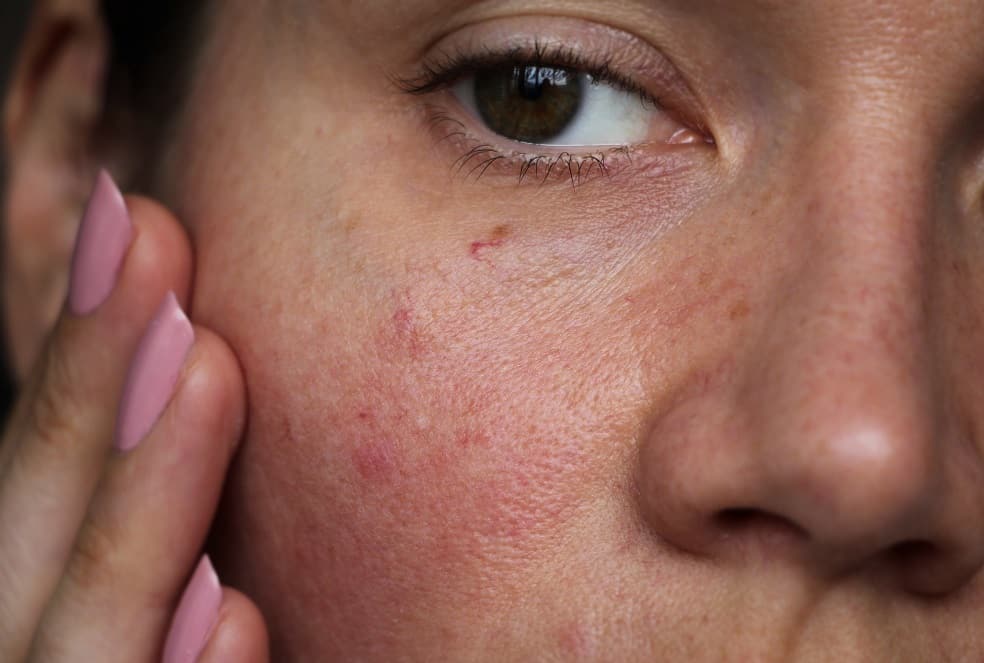
Neglecting post-waxing skin care can lead to several skin issues, such as prolonged redness, irritation, and bumps. The skin around the eyebrows is sensitive, and the waxing process can leave it vulnerable to irritation and infection if not properly cared for. Without adequate aftercare, the skin can become inflamed, resulting in unsightly and uncomfortable conditions that detract from the desired smooth, clean look of freshly waxed brows.
How to avoid: Proper aftercare procedures to enhance healing
- Immediate Cooling:
- Apply a cold compress or an ice pack wrapped in a soft cloth to the waxed area immediately after the procedure. This helps reduce swelling and soothe any initial redness or irritation.
- Aloe Vera Gel:
- Use aloe vera gel to calm and hydrate the skin. Aloe vera has natural anti-inflammatory properties that can help speed up the healing process and provide relief from any discomfort.
- Avoid Touching the Area:
- Refrain from touching or scratching the waxed area to prevent the introduction of bacteria, which can lead to infection or breakouts.
- Avoid Makeup and Heavy Skincare Products:
- For the first 24 hours post-waxing, avoid applying makeup, lotions, or any heavy skincare products to the waxed area. These can clog pores and irritate the sensitive skin.
- Stay Out of the Sun:
- Minimize sun exposure to the waxed area for at least 48 hours. If you need to be outdoors, apply a broad-spectrum sunscreen to protect the skin from UV rays, which can exacerbate redness and irritation.
- Exfoliate Gently:
- After 48 hours, gently exfoliate the area to remove dead skin cells and prevent ingrown hairs. Use a mild exfoliant and be gentle to avoid further irritation.
- Moisturize Regularly:
- Keep the skin hydrated by applying a gentle, fragrance-free moisturizer daily. This helps maintain skin barrier function and promotes faster healing.
- Avoid Heat and Sweating:
- Steer clear of activities that cause excessive sweating or expose the skin to heat, such as hot showers, saunas, and vigorous exercise for the first 24-48 hours post-waxing. Heat can further irritate the skin and prolong redness.
- Use Anti-inflammatory Products:
- Consider using over-the-counter anti-inflammatory creams or ointments designed for post-waxing care. Products containing ingredients like chamomile, calendula, or witch hazel can be particularly soothing.
- Monitor for Reactions:
- Keep an eye on the waxed area for any signs of adverse reactions, such as severe redness, swelling, or pustules. If these occur, consult with a dermatologist to prevent complications.
By following these aftercare procedures, you can significantly reduce the risk of prolonged redness and bumps, ensuring that your brows not only look great immediately after waxing but also remain healthy and irritation-free in the days that follow. Proper aftercare is crucial for maintaining the integrity of your skin and achieving the best possible results from your brow waxing sessions.
7. Waxing Too Frequently
Description of the Problem:
Waxing too frequently can lead to significant damage to both the skin and the hair follicles. When you wax too often, the skin doesn’t have sufficient time to recover between sessions, which can result in chronic irritation, redness, and even scarring. Additionally, over-waxing can weaken the hair follicles, causing them to produce thinner, more brittle hairs or, in some cases, leading to permanent hair loss. This damage can ultimately affect the overall appearance and health of your brows, making them look sparse and uneven.
How to Avoid:
To prevent the issues associated with over eyebrow waxing, it’s crucial to adhere to a recommended waxing schedule. Generally, it’s best to wait about four to six weeks between brow waxing sessions. This period allows the hair to grow back to a length suitable for waxing and gives the skin enough time to heal fully.
Here are some tips to help you maintain a healthy waxing schedule:
- Monitor Hair Growth:
- Pay attention to your hair growth cycle. Each person’s hair grows at a different rate, so adjust your schedule based on how quickly your brows grow back.
- Set a Regular Schedule:
- Mark your calendar or set reminders to ensure you don’t wax too soon. Stick to a routine to avoid the temptation of early waxing.
- Alternative Grooming Methods:
- If stray hairs bother you between waxing sessions, consider using tweezers to pluck a few out or using a brow razor for minor touch-ups. However, be careful not to overdo it.
- Listen to Your Skin:
- If your skin feels tender or shows signs of irritation, extend the time between waxing sessions. Healthy skin is crucial for achieving the best results.
- Consult a Professional:
- If you’re unsure about the appropriate frequency for your brow waxing, seek advice from a professional esthetician. They can provide personalized recommendations based on your skin type and hair growth patterns.
By following these guidelines and allowing sufficient time between waxing sessions, you can maintain healthy skin and beautifully shaped brows without the risk of damage.
8. Ignoring Skin Sensitivities and Allergies
Description of the Problem:
Ignoring skin sensitivities and allergies is a common mistake that can lead to exacerbated skin issues. When waxing products contain ingredients that trigger allergic reactions or irritate sensitive skin, the result can be redness, swelling, rashes, and even more severe allergic reactions. These issues not only cause discomfort but can also damage the skin, making it more susceptible to infections and other complications.
How to Avoid:
- Conduct a Patch Test:
- What It Is: A patch test involves applying a small amount of the wax on a discreet area of your skin, such as the inner forearm or behind the ear.
- How to Do It: Clean the test area, apply the wax, and leave it on for the recommended time before removing it. Observe the area for at least 24-48 hours.
- What to Look For: If you notice any signs of redness, itching, swelling, or irritation, it’s a sign that your skin may be sensitive or allergic to the product.
- Check the Ingredients:
- Know Your Allergens: Familiarize yourself with common allergens found in waxing products, such as fragrances, dyes, and preservatives.
- Read Labels Carefully: Always check the ingredient list on the wax packaging. If you see any ingredients that have caused reactions in the past, avoid that product.
- Choose Hypoallergenic Products:
- What They Are: Hypoallergenic products are formulated to minimize the risk of allergic reactions. They often contain fewer potential irritants and are designed for sensitive skin.
- Where to Find Them: Look for products labeled as “hypoallergenic,” “for sensitive skin,” or “dermatologist-tested.” These products are usually available at pharmacies, beauty stores, or online.
- Consult a Dermatologist:
- Why It Helps: A dermatologist can provide personalized advice based on your skin type and sensitivities. They can recommend specific products or ingredients to avoid.
- What to Ask: Discuss any past reactions you’ve had to skincare or beauty products, and ask for recommendations tailored to your skin’s needs.
- Use Gentle Waxing Techniques:
- Temperature Control: Ensure the wax is not too hot to prevent burning sensitive skin.
- Proper Application: Apply the wax in the direction of hair growth and remove it quickly and efficiently to minimize irritation.
- Aftercare: Use soothing products post-waxing, such as aloe vera gel or fragrance-free moisturizers, to calm the skin and reduce inflammation.
By taking these precautions, you can significantly reduce the risk of adverse reactions and enjoy smoother, healthier-looking brows without compromising your skin’s well-being.
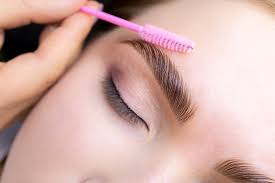
9. Inconsistent Shaping Techniques
Description of the problem:
Inconsistent shaping techniques during brow waxing can lead to uneven eyebrows, which can drastically affect the symmetry and overall appearance of your face. This issue often arises when individuals do not follow a consistent method or lack a clear plan for shaping their brows. Common signs of this problem include one eyebrow being higher, thicker, or differently shaped than the other, leading to a mismatched look that can be difficult to correct.
How to avoid:
- Map Your Brows:
- Begin by mapping out your brows using a brow pencil. Mark the starting point, arch, and end of each brow to create a guide. The inner edge should align with the bridge of your nose, the highest point of the arch should align with the outer edge of your iris, and the tail should extend to the outer corner of your eye.
- Use a Template or Stencil:
- Invest in a brow template or stencil to help maintain consistency. These tools can guide you in shaping both brows symmetrically. Position the stencil over your brow and follow the outline with a brow pencil before waxing.
- Work Slowly and Check Frequently:
- Take your time during the waxing process. Remove small amounts of hair at a time and frequently check your progress in a mirror. Compare both brows often to ensure they remain symmetrical.
- Follow Natural Brow Shape:
- Respect your natural brow shape as a guide. Over-manipulating the natural arch can lead to asymmetry. Enhance your natural brow rather than trying to create a completely new shape.
- Use a Ruler or Straight Edge:
- Use a ruler or straight edge to measure and compare the distance from the start, arch, and end points of each brow. This can help ensure both brows are being shaped evenly.
- Seek Professional Guidance:
- If you’re unsure about your shaping skills, consider seeking professional help. A brow technician can shape your brows and provide a template for you to maintain at home.
- Document Your Process:
- Take photos of your brows before and after waxing. This documentation can help you track progress and maintain consistency over time. You can use these photos as references for future waxing sessions.
By following these techniques, you can avoid the common mistake of inconsistent shaping and achieve beautifully symmetrical brows every time you wax.
10. DIY Disasters
Description of the Problem: Common Errors Made During At-Home Waxing
At-home brow waxing can be tempting for its convenience and cost-saving benefits, but it often leads to several common mistakes that can be both painful and unsightly. These DIY disasters can include:
- Incorrect Wax Application: Applying wax too thickly or unevenly can result in ineffective hair removal or even skin damage.
- Improper Wax Removal: Pulling the wax strip in the wrong direction or with insufficient speed can cause hair breakage instead of removal, leading to uneven brows and potential skin irritation.
- Inaccurate Brow Shaping: Without professional guidance, it’s easy to overpluck or remove hairs that are crucial for the natural shape of your brows, resulting in asymmetrical or overly thin brows.
- Skin Damage: Using wax that is too hot or not suitable for facial skin can cause burns, rashes, or allergic reactions.
- Lack of Aftercare: Neglecting post-waxing care can lead to redness, inflammation, and even infection.
How to Avoid: When to Opt for Professional Waxing Versus DIY
While at-home waxing kits are readily available, knowing when to seek professional help can make a significant difference in achieving the perfect brows. Here are some tips to help you decide:
- Complex Brow Shapes: If your brows have a complex or unique shape, it’s best to consult a professional who can expertly maintain the desired look without compromising the natural arch and symmetry.
- Sensitive Skin: Individuals with sensitive skin or known allergies should opt for professional waxing. Professionals use high-quality products designed for sensitive skin and can customize the treatment to avoid adverse reactions.
- First-Timers: If you are new to waxing, visiting a professional can provide you with a baseline experience and understanding of the process. This can help you learn the correct techniques for future at-home sessions.
- Major Events: For special occasions such as weddings, photoshoots, or important social events, professional waxing ensures your brows look their best without the risk of DIY mistakes.
- Pain Management: Professionals have techniques to minimize pain and discomfort during the waxing process. If you find DIY waxing too painful, a professional can offer a more comfortable experience.
- Aftercare Advice: Professional estheticians provide personalized aftercare advice, helping you avoid post-waxing issues like redness, bumps, and ingrown hairs.
By understanding the risks of DIY brow waxing and recognizing situations where professional expertise is invaluable, you can avoid common at-home waxing disasters and maintain beautifully shaped, healthy brows.
Recapping the top brow waxing mistakes, we’ve identified key areas to watch out for: over-waxing, under-waxing, incorrect wax temperature, inadequate skin preparation, and using the wrong wax type. Additionally, poor aftercare, waxing too frequently, ignoring skin sensitivities, inconsistent shaping techniques, and DIY mishaps can all lead to less-than-perfect results.
By understanding these common pitfalls and following the provided tips to avoid them, you can achieve beautifully shaped brows without unnecessary irritation or mistakes. Remember, the goal is to enhance your natural beauty through safe and effective brow waxing techniques. Practice patience, care, and proper methods to ensure your brows look their best.